Thursday, March 31, 2011

Splish Splash Cosmo Cricket Salt Air Layout

I can't believe I haven't posted since Monday! Man time is going fast! The kiddos are requiring a TON more attention lately so I haven't had nearly as much scrappy time.

I want to share my newest layout with you. I created it for the Cosmo Cricket challenge I host over at Scrapbook.com. You can see the challenge here: April Cosmo Cricket Challenge.
Make sure and check it out. Its really simple. Use 90% Cosmo Cricket products and have a mixed alpha title! Easy peasy right? Go check it out. I used a sketch from Scrap A Little for this layout. Oh, and the pink paper at the top...it looked more orangish when I created this layout at night with horrible lighting.
I did some fussy cutting and some doodling!

A few things in case you've missed them in previous posts:
1. Birds of a Feather is having a crop this weekend! Amy always has fabulous challenges and prizes. There will also be a few games!
2. One of my scrapbooking friends wanted to help the crisis in Japan. She crochets the cutest dang hats and is donating $20 from each at to the Red Cross Japan Relief Fund. Hop over to her Etsy store, Hook Happy. These would be fabulous baby gifts, Easter gifts, just because gifts! They are stinkin CUTE!

Monday, March 28, 2011

The Great Outdoors Layout using October Afternoon Campfire Line

Hello! I hope everyone had a great weekend! I was able to finish up this layout at the end of last week. My long lost twin, Karen, won this super duper cute Campfire October Afternoon line of of Julie Bonner's blog (or at least I think it was Julie's blog). She knew it would be perfect for me and being as sweet as she is, had it sent to me! :-0 I have the BEST EVER scrappy friends I tell ya!
A while back I won a fabulous Sketches for Scrapbooking Volume 7 from Allison Davis's site, Sketch Support. If you haven't checked out her site yet, your missing out! They have one incredible design team and fabulous sketches (2 pagers, 1 pagers, cards and more!).
I used a sketch from the book for this layout!
Again, I'm going to back to using more photos on a two pager. Haha, I just noticed one of my little words has moved in the journaling spot! I better go check that its still there!

The journaling goes a little something like this: This is my favorite camp spot. It is only about 15-20 minutes from our house. There is an old Ranger Station, a outhouse (still shocked that an outhouse would have two seats in it!!!) and a little creek that ran near it. Peyton is getting old enough he now gets to help by dragging wood/kindling for the campfire. Maddy wanted to do whatever Peyton did. Both LOVED going down to the creek and roasting marshmallows. The picture of the calf, well, it apparently wanted to race us. The rest of it friends wandered off down the hill. But not him, he kept running up the hill! It was pretty funny!

Last week, one evening, the sun decided to come out for a bit. So we took off for a little walk and took the kids to the creek. It is so full right now, actually loud enough too that we can hear it from our house at night if we are outside.
Of course it wouldn't be going to the creek if we didn't throw rock after rock after rock in the creek.
The kiddos searching for rocks. I thought I should take my lawn chair down there next time. The kids could play for HOURS and it would be a nice break. Although I think I'd have to tie a rope around Maddy to myself as she has no fear!

Thanks for stopping by!

Friday, March 25, 2011

So Sweet Birds of a Feather Layout and Cake Pops

I have another layout to share today using the super cute and fun March Birds of a Feather Kit Co kit. Everything is from the kit and add-ons except the Thickers and scraps I used for the scalloped circles.
I did a lot of doodling. I am pretty sure it was Julie Bonners blog that I saw the different stitches idea like I did on the bottom.

I have been seeing cake pops all over the bloggy world. Then recently while at a flea market type event I tasted one. OH.MY.WORD. was it ever good! I don't remember how I came across this blog, but I did. The blog had a tutorial posted! What perfect timing! :-) A while back Mara had posted a DELICIOUS Snickers Cupcakes recipe with a incredible caramel frosting on her blog. I decided to combine the two. You can see the recipe I used here, or follow these instructions. As you can tell, I need a lesson in dipping things in melted chocolate. These do not look pretty, but dang, their taste makes up for their looks! :-)
1. Bake a cake according to the instructions on the box. I used a Butter Chocolate Cake.
2. Let cake cool COMPLETELY. I refrigerated mine for a while. Then crumble it up in a big bowl. I then refrigerated it more while I made my frosting.
3. You can use store bought frosting or make your own. I opted to make my own. Recipe can be found below. Mix the frosting in with the cake. It will turn into a chunky pudding type texture.
4. Roll the cake/frosting mix into balls and place on a cookie sheet. Mine were smaller in size and made roughly 48-52.
5. Place cookie sheet in freezer. Let the balls freeze pretty hard.
6. All I could find was Almond Bark that was chocolate flavored. I used the WHOLE pack and was short just enough to cover three balls. Melt the chocolate and dip the frozen balls, completely covering them. Place the chocolate covered balls on wax paper.

Now, I am not a cake fan, but these babies are DANG good! The instruction I linked you too, showed the balls on a little stick. I didn't mess with doing the sticks.

Caramel Frosting:

2 sticks unsalted butter, room temp
1/2 cup shortening
2 tsp pure vanilla extract
1 1/2 lb confectioners sugar
1/3 cup caramel topping
1/4 tsp salt

1. Cream butter and shortening in electric mixer. Add vanilla, salt and caramel. Combine well.
2. Begin adding in sugar and mixing thoroughly after each addition. Give it a taste to see if it need more caramel .

I used salted butter and substituted butter for shortening and left out the salt and it came out just as good as the first batch I made following the instructions to a 'T'.

Thanks for stopping by!

Tuesday, March 22, 2011

My Little Shoebox Sketch Challenge Layout and Crochet for the Cause

My Little Shoebox has a sketch challenge up on their blog. You can find it here. It just so happened that Amy at Birds of a Feather Kit Co. sent me her fabulous March kit with MLS papers, stickers and die cut journaling spots in it to design with!

This is my take on the sketch:
I struggled at first, but am okay with the end results! :-)
I did lots of layering and doodling on this layout!
The patterned papers, stickers and die cut was from the MLS Home Tweet Home line all included in theBirds of a Feather March Kit. The Basic Grey button came in the Birds of a Feather March Kit. The Adornit tiny alphas and Thickers came from my stash. The chipboard flower came from a past add-on at the BOAF store.

Want to help the crisis in Japan, but not sure how? Hop over to Hook Happy (an Etsy store). Deb has knit some ADORABLE hats and is donating $20 from each hat to the Red Cross Japan relief fun. She is doing this for the next month! So hurry on over there and check it out. These hats are absolutely ADORABLE! Need a baby or birthday gift? This would be PERFECT!


Just one more thing....Birds of a Feather is having a crop April 1st-3rd! Come and join us! There are always fun challenges and games, plus you can't be the super friendly group of gals there!

Thanks for stopping by!

Busy busy busy

It seems I haven't had much time to get crafty lately! :-( I made a bunch of cards to sell at a flower shop, but forgot to take pictures of them. :-( We were also gone ALL WEEKEND yet again too which doesn't help my crafty time!

So Friday, as we are headed to Madras where Chris was planning to hook up to our camp trailer and tow it over the mountain to trade it in, we faced this!
Fun stuff huh? I was not liking the thought of him pulling the trailer at all! But as luck has it, the sun did come out after a bit and melted most of it! He did make it over the mountain and did return safely with our new smaller camp trailer!

Sunday, although cold, the sun popped out for a bit. The kids have been begging to play outside, so out they went. Peyton ran all over the place chasing the baseball he hit. Maddy loved to play on the 'wwwweeeeeeeee'. Thats what she says when she goes down it, so thats what she calls it!

I'm really hoping to hit my scrap table and be back soon with something to share!

Thanks for stopping by!

Friday, March 18, 2011

Birds of a Feather Kit Co. Cards

Here are two more card I created using the March Birds of a Feather Kit Co. Kit and Add-ons.

From the kit: KaiserCraft Hippy Chick patterned paper and chipboard shapes, My Little Shoebox patterned paper, Basic Grey Button, Bazzill Cardstock.
From my stash: Card base and twine.

Peyton created some magnet foam frames for his Grandmas the other day. One morning before school I asked them to stand next to each other for a picture. This is what I got:


I can't figure out my camera. Peyton looks blurry in most of them. :-(

Wednesday, March 16, 2011

The Big Day using March Birds of a Feather Kit

First off, my apologies for the smudges and what not on the layout! Maddy decided she wanted to scrapbook. Chris found her on top of my scrapbook table, ink all over her and my layout, my photos torn off, smudged and crumpled, my glue bottle tops missing...I think your getting the picture!

This is another layout I created using the March Birds of a Feather Kit and Add-ons! I'm telling you, you can get a lot of projects done with the kit and add-ons!
First off, I LOVE LOVE LOVE the embossed swiss dot cardstock! It is so so so cool!
Included in the kit were the Prima leaves. They are definitely going on my to-get-again list! Quite a few came with the kit, but I'm LOVING using them!
Aren't the coiled flowers fun? The leather lacing was included in the kit. I was inspired by a Jillibean embellishment.
I glued the Kaisercraft Hippy Chic chipboard flower to a piece of black cardstock and trimmed it down. I think it helped balance out the black on the right side of the layout. I then glued buttons on top of the chipboard.

I am HORRIBLE about keeping track of specific papers and supplies and such. But here it is, if you have specific questions, please ask, I can retrack it for you! Kaiser Craft Hippy Chick patterned paper and chipboard, Basic Grey Buttons, My Little Shoebox Home Tweet Home patterned paper, die cut journaling spot and alphabet stickers, Bazzill cardstock, Prima leaves and leather lacing. From my stash was the black cardstock.


Thanks so much for stopping by!

Monday, March 14, 2011

Welcome to my Nest Home Decor Project


I am so excited to share this project today! I created it for my GDT gig at Birds of a Feather.
A few days ago, I saw this idea over at Mrs. DIY and the Tennis Guy and instantly knew I wanted to try it! I opted to create a piece of decor rather than a picture frame.
I used my FABULOUS March Kit from Birds of a Feather. The fun papers, chipboard leaves and and journaling die cut all came from the March Kit and Add-ons! The title was mine, a mix of Jillibean soup (corrugated chipboard and stickers) and some chipboard alphas I got from the dollar spot at Michael's a while back.Abby showed a layout with the stitching on the Jillibean corrugated alphas. I LOVED how it look and wanted to try it. Will I do it again? Probably not, it took a lot of time! But I still love how it looks!

Some info on the pedestal frame...I went to the thrift store and found a brass candlestick for $1.50. While at the dollar tree, I found the frame. I went home and spray painted the candlestick black. When it dried I used gorilla glue to glue the frame onto the candlestick and created the 'welcome to my nest' part! I have noticed that the paint is fairly easy to scrape off. I'm wondering if there is a sealer spray or something along those lines out there I could get.

I am addicted to these. There will be MANY more in my future! :-) I do, however need to work on my gluing skills! :-)

I'm linking this up to Tip Junkie's Tip Me Tuesdays! If you've never checked out here Tip Me Tuesdays posts, they are full of fun ideas!
Thanks so much for stopping by!

Sunday, March 13, 2011

Dinosaur Paintings for Peyton

Hello! I hope everyone is having a great weekend! I am so excited about these paintings I just bought for Peyton's bedroom I wanted to share them here! He will get them on his birthday.

I had high hopes to decorate the whole house when we moved in a year ago. It just hasn't happened though. :-( I am determined to get going on it again though. A while back I saw some adorable paintings on my friend Melonie's blog. She had the paintings linked to her Etsy store. Go check out her store, she has the cutest darn paintings! I e-mailed her and asked if she would do a special order for me. This is what she created:
Cute, huh? Thanks so much Mel! I can't wait for Peyton to open them! They are going to look fantastic in his room!

I have a super fun new project to share tomorrow so make sure to come back and take a peek at it!

Friday, March 11, 2011

February Projects 12 using Cosmo Cricket Salt Air & The Paper Variety Challenge

I am having a BLAST doing Project 12! If you aren't familiar with it, check it out, its never to late to play along! This is my layout for February!
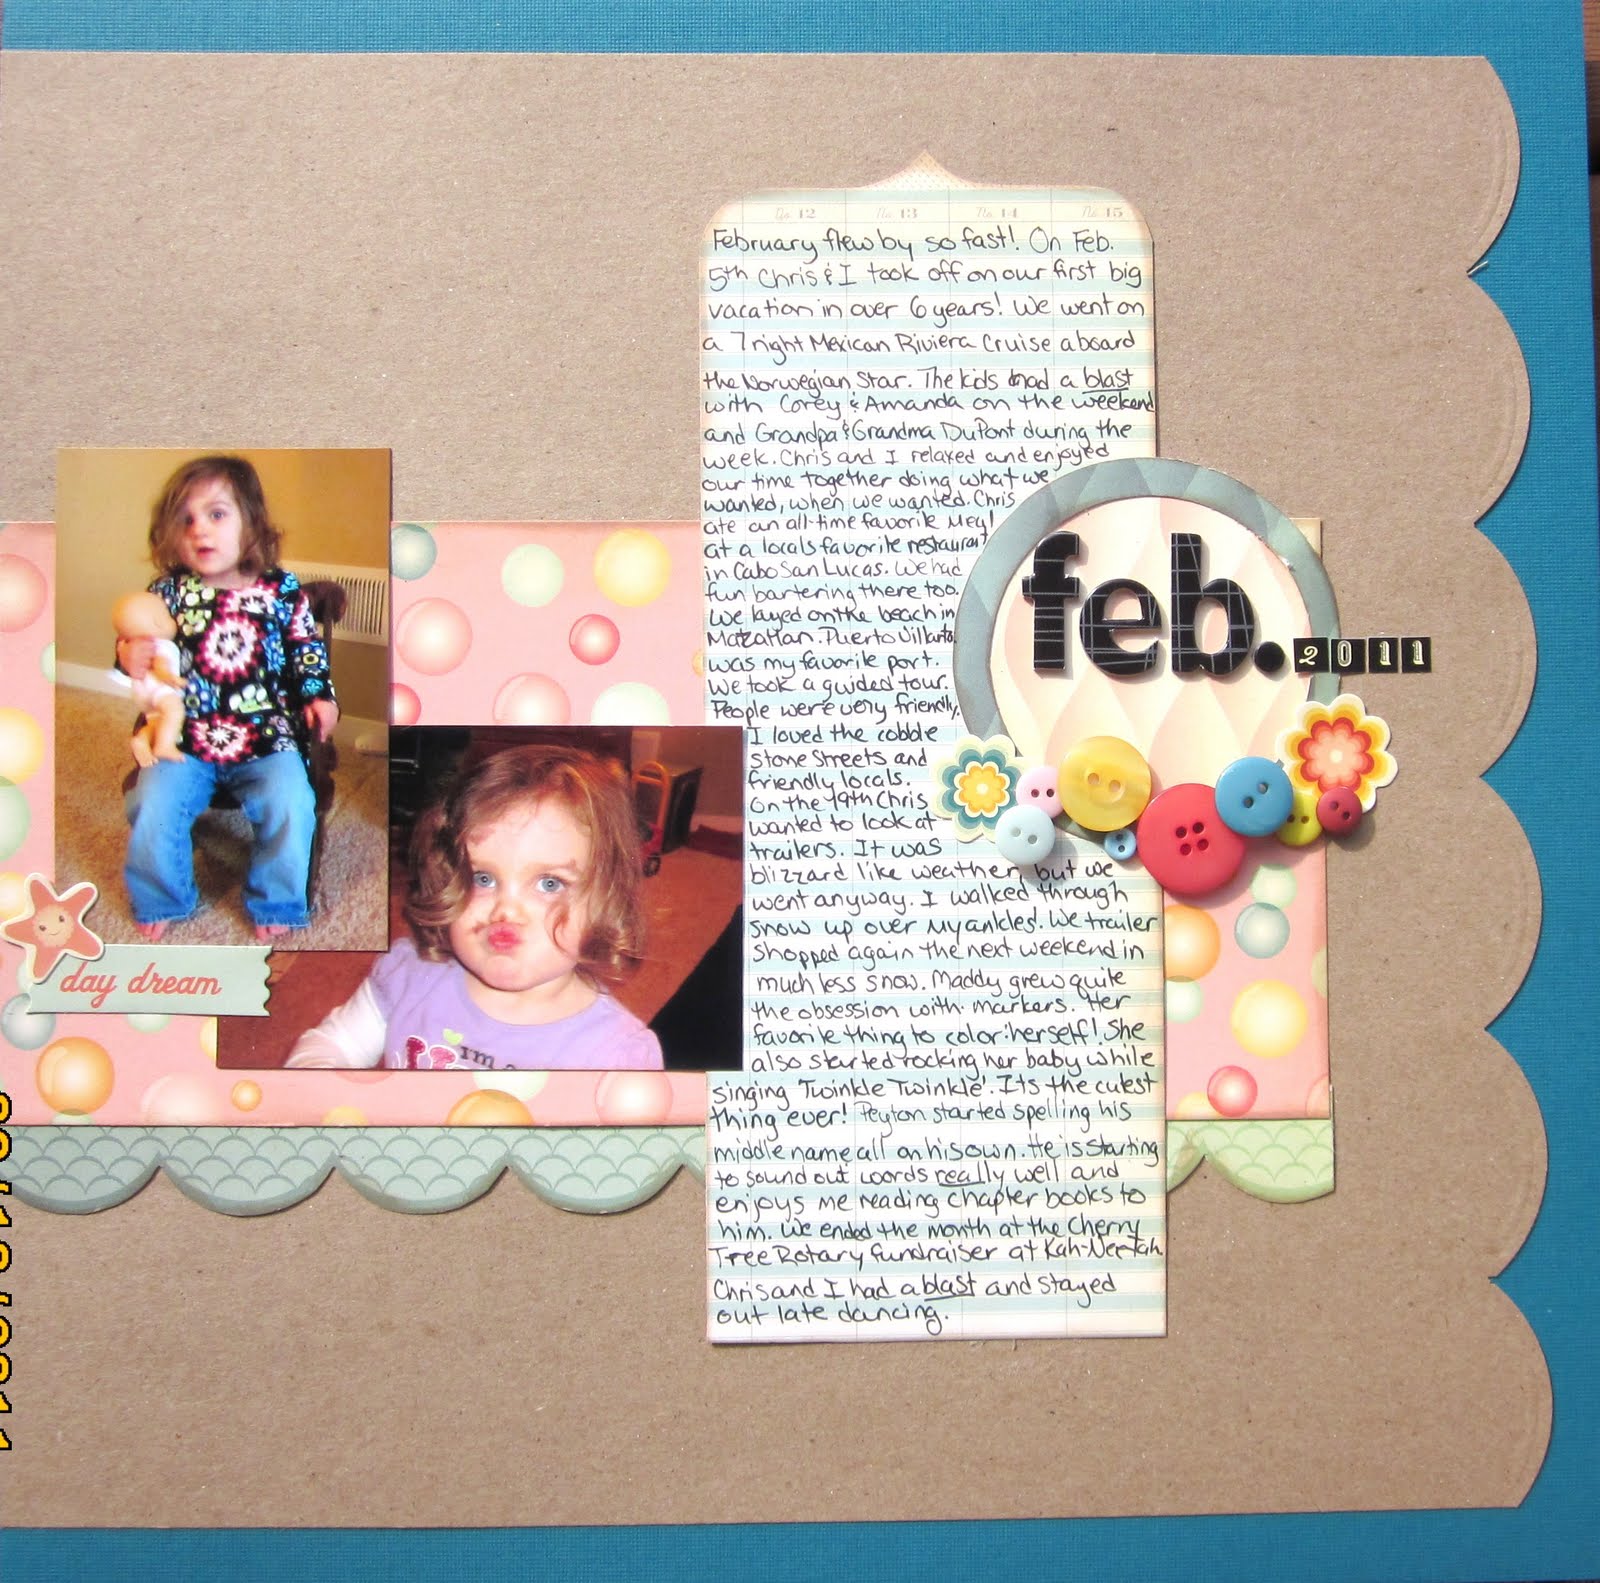
The fabulous Cosmo Cricket gang was so kind to send me the new Salt Air Paper Crafting Kit! It was PERFECT for this layout! Sadly I didn't get many photos in Feb. Mostly cruise pictures.
How perfect is that tag?!?! Most of the buttons are Cosmo Cricket Togetherness buttons, but I added a few from my stash also.
I'm loving circles these days! :-) I used two different thicknesses of pop dots to help layer the buttons!
A close up of the left page...It was hard to choose photos, so I opted to crop a few really small from different 'favorites' from our trip. Chris's meal of the whole trip, our tequila tasting, we played tons of cribbage (I whooped Chris pretty good!!!) and bartering for souvenirs.
The right page. I had LOTS Of journaling this month and could have had more! haha! I love the picture of Maddy rocking her baby singing to it. Give her a marker and I swear 30 seconds later its all over her. I did journal about Peyton too. I didn't totally leave him out of the picture! ;-) He is sounding out words really well and shocking me in what he's reading when he wants too. He'll see words on advertising boards, tv, etc and figure them out! He is also enjoying chapter books and often asks me to read them to him at night.

A friend of mine recently had a procedure/surgery done. I wanted to send her a 'speedy recovery' card. I had a card saved to my inspiration file on my netbook and thought it just perfect! The card was created by the fabulously talented Jan Tatomir! This is also for The Paper Variety Challenge, which was to create a get well card!
I used papers from the March Birds of a Feather Kit. The Kraft paper, rhinestones and SRM sticker were from my stash. But the other papers came from the kit or add-ons!
Its hard to see, but the white paper is embossed! SUPER COOL paper and its in the kit! :-) A side note, I bought the Martha Steward Classic Butterfly punch at Michael's when I had a50% off coupon. About a week or two after buying it I used it and it didn't work. It was a faulty one. I e-mailed the company and they sent me a new one within a week! I was VERY impressed with their customer service! :-)

Don't forget about my Cosmo Cricket Challenge over at Scrapbook.com! The winner gets a Social Club Paper Crafting Kit sent to them directly from Cosmo Cricket AND gets to be featured on the Cosmo Cricket blog! How cool is that! Hop over and check out! You can see my post about it here: March Cosmo Cricket Scrapbook.com Challenge.

Also, to my friends Moto and Yuko in Japan...if you happen to read this, will you e-mail me and let me know you are okay! My parents and I are worried about you and hope you are safe and okay! I tried e-mailing you, but it was returned!

Thanks for stopping by! I have a really cool new project I am super excited to share. I just need to get a good picture of it! So stay tuned!

Thursday, March 10, 2011

Pleat Tutorial for Birds of a Feather

This pleating is so easy! Watch out though, it becomes addicting!
I saw this idea quite a while ago in the blog world, so the original idea isn't mine, but the tutorial pictures and directions are mine.
1. Cut a 1 1/2" strip from your paper. Any length you want, you may need two or three strips depending on the length of your pleat. For my layout I had a 8 1/2" pleat and needed 11 pleat pieces.
2. Use a decorative edge punch and punch along one edge of each strip you cut. I used the Fiskars scallop punch.
3. Cut the strip into 1 1/4" pieces.
4. Fold two sides in, as small of a fold as you can.
5. Ink the edges, as much or as little as you like.
6. Cut a piece to adhere the pleats to in whatever length you desire and at least 3/4" wide.
7. Lay the larger piece you just cut onto the table. Space out pleats below it. You will want to have one less pleat for the top layer.

8. Flip the larger piece over and with a pencil, mark the center of the top layer of pleat pieces.
9. Put adhesive/glue on the marks and adhere the pleat pieces about 1/4" or a bit more from the bottom edge. (I used my ATC gun)
10. Put glue/adhesive in between each pleat for the rest of the pleated pieces. Adhere the pleated pieces about 1/8" from the bottom to give them a bit more length.
The above picture is what it should look like from the back. Below is what it should look like from the front.
I covered the backside with a liquid glue when gluing to my card and layout. This helped secure the pieces better and allowed me to nudge them just a bit if needed.

Here is a layout I did with the pleats.

So easy and fun!

I hope you enjoyed the tutorial! If you end up giving the pleats a try let me know! I'd love to see it!

Thanks for stopping by!

LinkWithin

Related Posts with Thumbnails